EXPERIMENTAL:
HDR Photography

 Here are two examples of HDR images. As we can see they are of very high quality with the whole images composed in great detail. This is because of the dynamic range in the photos. The first photograph is a HDR landscape photo where the photographer has used bracketing to find the best exposure value needed to produce the final image of the lake. We can see every grain of the rock and nearly all the leafs from the trees in high definition. Also, looking at the sky we can see that the tone-mapping technique has complimented the rest of the image by using different values to the landscape. The second image is a portrait of a man playing a trombone. The HDRI application has been used to show people his skin, eyes, and emotion in a much stronger detail, maybe for a stronger thought-provoking photo.
  This image shows us the difference between the same photograph before and after using the HDR technique. The first seems okay, but we get a feel for a less textured image. Whereas the second photo shows the floor and flowers in much more detail. The bike has been improved massively in the second image showing how the HDR application can improve metallic objects massively. A disadvantage I would say from the HDR image would be the wall above the window looks rough or much stronger than the softer wall in the first image. Even though it is HDR in the second image and we have found the best dynamic range possible, we could still soft the wall later in a editing software, therefore in the long run HDR is always a good method in photography.
 Here are some examples of my HDR images:


 These images I used the same method. I set
the aperture and shutter to match, whilst using a tripod I adjusted the
exposure settings and used a bracketing setting of +1 and -1 by 3
stops, then set a timer for 10seconds whilst I steadily moved away from
the camera to avoid camera shake. Later I merged the three images of
different exposures unto Photomatix Pro which allowed me to make the
images HDR. I think metallic objects are great for HDR so I went into a garage, kitchen, and found an engine to photograph. I like the gritty-look in HDR such as in the engine photo, I think it worked well, the effect with that image. A problem I did find with the kitchen photo
These images I used the same method. I set
the aperture and shutter to match, whilst using a tripod I adjusted the
exposure settings and used a bracketing setting of +1 and -1 by 3
stops, then set a timer for 10seconds whilst I steadily moved away from
the camera to avoid camera shake. Later I merged the three images of
different exposures unto Photomatix Pro which allowed me to make the
images HDR. I think metallic objects are great for HDR so I went into a garage, kitchen, and found an engine to photograph. I like the gritty-look in HDR such as in the engine photo, I think it worked well, the effect with that image. A problem I did find with the kitchen photo 
was that the oven was a little greasy from cooking in the past. Also the shiny surfaces in which I had to hide to hide reflections of myself. These four images where the very first HDR images i have ever taken.


Self Portrait Experimental
As part of my experimental project my first experiment was for SELF PORTRAIT with a twist. I planned my final image in a different way than just using a camera, this is experimenting with PHOTO-graphy. The trick that I used was a PHOTO-copier. This is the step by step process I took to reach my final image for (SELF PORTRAIT EXPERIMENTAL.)


Next I thought of photocopying my t-shirt in the machine, for the decorative design, I could use for my final collage image. After I stuck it to a big purple A6 piece of paper which I used as a montage background.


I arranged these photos of me after I gathered enough images of my face, for expression. I called this "the punch" because the arm is raising as to strike someone, that impact as thoughts and emotion race through your head as it hits you. The blue lines where added by pencil and markers for a sort of pop art effect, yet simply.

 Then I thought to use pastel red to colour in some sheets of tshirt photocopied paper. But it turned out a little slow and greasy so I turned to red oil paint and smudged it in to create a red colored sheet. Next time to I should of used red paper to save a lot more time.
 FINAL SELFIE COLLAGE "THE PUNCH" EXPERIMENTAL PHOTOGRAPHY

Then I photographed my final image and airbrushed it. I'm happy with the blood red Rose theme in the background with the black and white "self portrait" photo montage. I was inspired by Pablo Picasso but I wanted to go more extreme and have multiple faces. It was called "the punch" because it was about showing the different emotions and facial expressions we do in the instant seconds of impact. I wanted to used the words sin repeatedly and the red rose theme to compliment the white and black shades of the faces and the mood of the photos.
Light Painting Experimental
What is Light Painting?

 Light Painting is when you paint a photograph with with some type of light in all sorts of colors. A slow shutter is used to not allow any light into the camera, while people use a light source to illuminate an object or subject, or even freehand.
(These two images I used a slow shutter and a light pen (green) and an app on the second picture for flashing light colors.)
Here are some different experimental light photographs I did using a slow shutter and a matching aperture for nicer images. I used various apps and a pen, lighter, tripod and sometimes without.


In this photograph I again used a slow shutter speed to allow a slower capture of the image which I used a shorter shutter because I need like 1-3seconds to make the camera blur a little for this achieved look. I took about three photos, so for luck this one turned out quiet well. It reminds me of a wavy mirrors or a posh door. The lines in the picture create shape which is curvy and vertical, lines lead viewers to certain points, into nothing but I still think it's interesting because of the actual light. If I was to re-do this I would of liked it to be more brighter as a whole, without blurring the background as much.

This photo was of a flower, maybe a tulip or some rose. I used a slow shutter speed around 20" seconds exposure and an app on my Samsung tablet. I selected different colors on the tablet whilst the shutter was in progress of recording the light coming in into the camera. I did this photograph in the pitch black to prevent ruining the image because I wanted a black background for the flower. I used green, yellow,orange, red, and white and tones of blue by changing the screen and waving them in front of the camera. I then later added a filter of 'cell like worms' to show the anatomy of the flower for a scientific approach to the photograph.
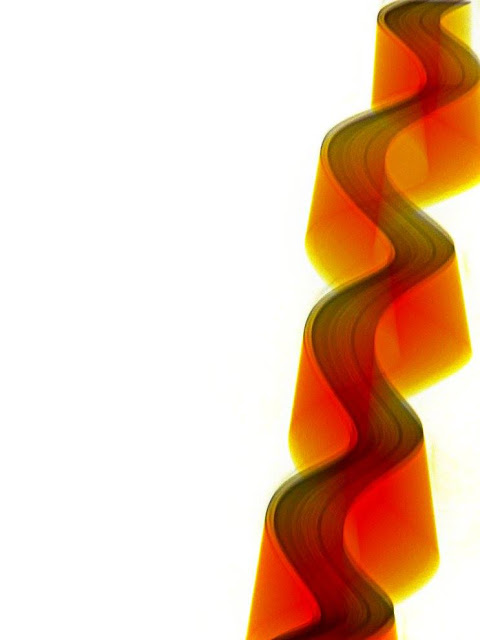
 I liked this image because of the visual art factor. I used a very slow shutter but I liked when I came to edit it, how strong it came out. I love the strong, slow, bold strokes of the orangey-red color with the yellow tips as it gives it a 3D, 'M or W' effect. To me this light painting looks like a illusion in the way the waves twist and bounce. It contains a rule of thirds and sort of symmetrical. I was happy with this.
 This to me was literally a definition of a light painting, because we have the white canvas looking background, that I used a 'negative' filter over the photograph. It was of Christmas lights going down a pole that resemble some sort of paint brush marks or like a paintball gun that shot a canvas, perfectly. Using a slow shutter speed and later editing this negative filter helped me to acquire this image using Light.
MY FINAL LIGHT PAINTING IMAGE;

My final image for experimenting with light was this photograph. I used a slow shutter speed and did a "n and u" shape with the light source of an app from my tablet. The slow shutter allowed to create a strong, high quality, 3D looking shape. I later rotated and added a negative effect and brown tint, since I used a yellow screen light source, in the editing process it turned out to me something similar to some sort of wavy warm caramel chocolate, therefore I called it Le Chocolat. The tones of light brown sticky caramel can be seen under the wiggly road of the darker chocolate on top, also where we can see streaks of thin-poured looking chocolate. It has an ultra clean white background so it compliments le choclat.
Silhouette Experimental
Silhouette photography is when photographers shoot a subject or an object behind a well light background, such as the sun or some sort of studio light. Silhouettes are typically a solid blacked out, featureless shape, however for my experimental I want to tweak it a bit and leave a little detail and color in some of my photos.
Here is some examples of silhouette photography;


These images however all using sunlight for the background lighting I will use a variety of lights and experiment with shapes, colours, filters, lights, angles etc.
Here are some trial and error photos that won't used because they wasn't to my satisfaction;

This photo of a silhouetted butterfly was suppose to show it tramped, looking out the window as to fly off. I didn't use this as my final image because the quality to me was a little low. Where the light is coming through isn't to clear and with the butterfly's silhouette I felt didn't look right. I added a vignette effect around the picture in black to focus more on the butterfly and to frame it so it looked more locked in. However I do like the pose and antennas of the butterfly up close.

This was a half a self portrait of myself, I used a yellow bulb spot light to light one side of my face while i was in a studio with the lights off. I wanted to silhouette half of my face from the other side. I did this by putting the light on the side of me with the camera on a fast shutter speed and timer. I later edited the image with a fuji filter and then a cross process filter to give it this final image. I cropped and saved the image, however I didn't feel it was good enough for the final image.


This image was of a statue mannequin dressed in Chinese silk robes. It was shot on location, with a bright exposure coming from behind the object and I thought because it was a dark mannequin and the strong daylight coming from behind it, I could get a good silhouette looking photograph. I went for an enchanting, mysterious Chinese man and blurred his face on an editor and used the silver screen filter as the color theme. I wanted to make it a light-up silhouette where we could kind of see his face in the darkness, even though unconsciously not knowing the mannequin is lifeless.
If I was to change something about this image now I would of made it a lot more of the typical, traditional silhouette by burning the front of the figure.

In this photograph I got in close to a thorn bush and focused my camera entirely on the sun, using a branch off the bush to cover and block it a little bit. The whole bush is in silhouette and the sun has a beautiful warm lighting coming towards us, also giving a HDR glow around the bush. I later used a HDR tool to sharpen the picture and also added a little 'clarity.' I think I also added a filter either a warm filter or I saturated the image with better levels of red, to add warmth.
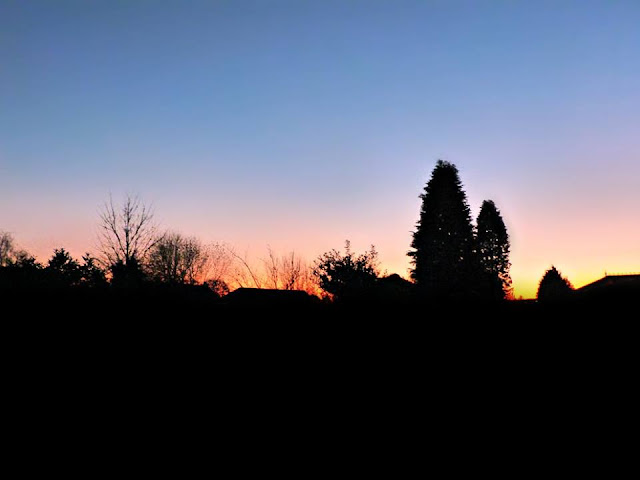
 It has one half of the photograph in vivid colours. Tones of blue, orange, pink, yellows, whilst the bottom half of the photograph is a silhouetted, black out landscape outline. I like the image because it shows the sunset at the best time for the image setting over the scene where all the nature is outlined, like the scene is about to go to sleep.
These create the 'shapes' in the image with it being taken from quiet far away using aperture and editing most of it. I was inspired with the sun as my lighting in the end because it's our strongest light source on earth and the nature could compliment the image. If I was to retake the image I would definitely use HDR for the sharpness of the trees in the distance.
MY FINAL SILHOUETTE IMAGE

Photo Manipulation Experimental
Photo manipulation is when you manipulate or change an image in any way, shape or form. It could be an advantage as use to advertising but is discouraged in Journalism photographs. I am going to do some photo-manipulating and experiment with [props, models, editing softwares,etc]
What is Photo Manipulation? - SIMPLY;

Here are some of my trial and error photos, as part as the practice of getting better with experimenting and developing, mistakes are helpful in improving your knowledge and technique;
 This was my very first attempt at photo manipulation, I used my thumb with the camera on an aperture to take a picture of my thumb and blur the background. I rotated it to make it look like the desert. I edited later and sharpened it then added a layer of stars whilst blending out the the sun as a distant planet. I got carried away and tried to make it look artistic my adding a graffiti or tattoo looking sun-dial stamp with a horse rider on the desert, to make the whole image seem like a story or message. I've learned not to use stickers anymore, unless done more careful.


In this I planned to use a canvas with paintbrush and palette as props. I wanted to edit the paint into different parts of the photograph later. I used certain colours to represent sky, grass, fire etc. Like a god creating the universe this image has a sharp line running into the picture making it an eye leader to the point where the brush touches the canvas.


This is a photo shoot I did of a child who liked the Disney film Frozen, my niece who wanted to look like the character Elsa. She wore a costume and I told her to act as if the snow and ice was around you like the movie. I later edited the image on Ribbet blurring out the old background using layers to blend in and out. I thought the second attempt was a little better.
In this one the model showed more emotion and characteristics, therefore it made the manipulation a little more believable. The background shows a palace in which the polar bears guard whilst the model is in charge using magic, that was edited on Ribbet using an electric bolt of lighting. The layers were also blended together on there, also the touching up. I liked this image because she was happy with the final image and It was a fun manipulation to do.
MY FINAL PHOTO MANIPULATION IMAGE

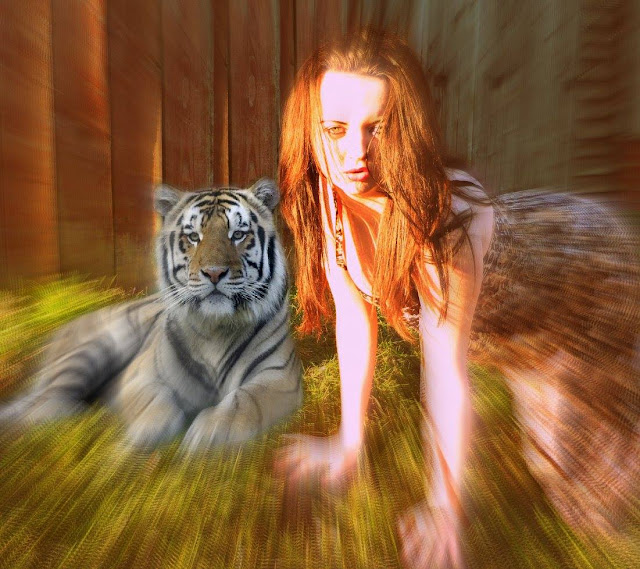
I liked this image because it's simple but i feel its well edited or manipulated because how the model is next to tiger whilst being able to pose like a tiger herself. So it's like fashionable in her costume but with a lion on the shoot. It was also on a location on grass, where the tiger seems to be sitting on next to the model. The lighting is natural on the model but I could of dodged the tiger a little for a brighter glow. However I think this image works well with the blur as-well, I wanted the glare look a camera zoom could achieve, the look an angry tiger looks.
My Final Experimental Photos'
Here we can see my final seven experimental photographs that show how we can experiment in photography in many different ways and take new approaches and how new ideas can be created from such simple things. If we didn't experiment with art and reality then we wouldn't have anything else to photograph;
HDR Photo 1

Le Choclat - Light Painting experiment
Garden Silhouette - Silhouette experiment
S!nner collage - Self Portrait Experiment

Girl with Tiger - Photo Manipulation Experiment